ffmpeg-pythonでサクッとNumPy配列から動画を出力する

ffmpeg-pythonを使って、NumPy配列から動画を生成する方法を説明します。OpenCVのVideoWriterよりも、コーデックの問題が発生しづらかったり、画質を柔軟に選択できるようになります。とりあえず「サクッと」動画を出したいときに使えるのではないかと思います。
目次
はじめに
OpenCVのVideoWriterによる動画エンコードは何かと使いがちですが、不満点もかなりあります。例えば、
- エンコードでハマりがち
- 例:コーデックをmp4vで指定すると、Chromeで再生できない動画が出来上がる
- 例:H264でエンコードしようとすると、かなり環境構築を頑張らないといけない(主にDockerfile)。サクッと動画吐き出したいときにこれをやるとオーバーキル感ある
- ビットレートを指定できない
OpenCVの動画吐き出しも結局はffmpegからのラッパーなので、ffmpegからやってみようという趣旨です。検索してみたところ、OpenCVの動画の吐き出しは結構出てきましたが、ffmpegからの情報はあまり出てこなかったので、自分用メモとして書いておきます。
Windowsの場合は、実行ディレクトリにffmpegのバイナリおくorバイナリにパスを通すということがいるので、どちらかというとLinux環境での想定です。このケースでは、Docker上で動画を吐き出すケースを想定しています。
ベースのイメージ
ffmpegとffmpeg-pythonと最低限のPythonが動くだけのDockerイメージを作ります。
FROM ubuntu:20.04

RUN apt-get update
ENV TZ=Asia/Tokyo
RUN ln -snf /usr/share/zoneinfo/$TZ /etc/localtime && echo $TZ > /etc/timezone
RUN apt-get install -yq --no-install-recommends python3-pip \
        python3-dev \
        wget \
        git  \
        ffmpeg \
        tzdata && apt-get upgrade -y && apt-get clean

RUN ln -s /usr/bin/python3 /usr/bin/python

RUN pip install -U pip &&\
  pip install --no-cache-dir ffmpeg-python pillow numpy
ビルドして実行します。
docker build -t ffmpeg_numpy .
docker run --rm -it -v $(pwd)/src:/src ffmpeg_numpy
カレントディレクトリ以下の「src」フォルダを作業ディレクトリとし、マウントさせます。
Pythonファイルを実行するときは、
root@f4bc2c33f365:/# cd src
root@f4bc2c33f365:/src# ls
cat.jpg  ffmpeg_numpy.py  out.mp4
root@f4bc2c33f365:/src# python ffmpeg_numpy.py
このように実行します。公式ドキュメントが参考になりました。
https://kkroening.github.io/ffmpeg-python/
NumPy配列から動画を作る
まず単純な例として、
- Inputの動画はなし
- フレームを何らかのNumPy配列で作り
- Outputは動画
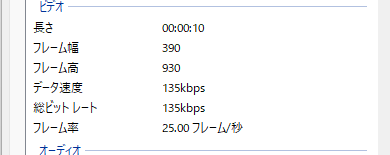
とします。適当な画像をスライドさせる動画を作ってみましょう。以下の画像を「cat.jpg」とします。

import ffmpeg
from PIL import Image
import numpy as np

def write_test():
    base_img = np.array(Image.open("cat.jpg"))
    height, width = base_img.shape[:2]

    process = (
        ffmpeg
        .input('pipe:', format='rawvideo', pix_fmt='rgb24', s='{}x{}'.format(width-250, height))
        .output("out.mp4", pix_fmt='yuv420p')
        .overwrite_output()
        .run_async(pipe_stdin=True)
    )
    for i in range(250):
        frame = base_img[:, 250-i:width-i, :]
        process.stdin.write(frame.tobytes())
    process.stdin.close()
    process.wait()

if __name__ == "__main__":
    write_test()
以下のような動画が吐き出されます。
フレームレートを変更する
先程出力されたビデオは25fpsでした。任意のFPSに変更したいと思います。

ffmpegのフレームレートの設定は「-r」オプションでできるので、
def fps_test():
    process = (
        ffmpeg
        .input('pipe:', format='rawvideo', pix_fmt='rgb24', s='{}x{}'.format(640, 320), r=5)
        .output("out.mp4", pix_fmt='yuv420p')
        .overwrite_output()
        .run_async(pipe_stdin=True)
    )
    for i in range(256):
        frame = np.full((320, 640, 3), 255, np.uint8)
        frame[:,:,1] = 255-i
        frame[:,:,2] = i
        process.stdin.write(frame.tobytes())
    process.stdin.close()
    process.wait()
このようにすると5fpsの動画ができます。256フレームが5fpsなので、51秒です。
動画から動画
より実践的な例として、Inputが動画、Outputが別の動画を見ていきます。一本のprocessとしても書けますが、複雑な処理をすることを考えて、フレーム単位で一旦NumPy配列として引き出します。
このやり方は公式ドキュメントにも載っており、これをほぼコピペしました。
以下のコードでは次のことをしています。
- 入力動画の解像度(1920×1080)→半分に圧縮して動画出力
- FPSはそのまま
- 画素値を0.4倍にして暗くする
def video_to_video():
    probe = ffmpeg.probe("target_video.mp4")
    video_streams = [stream for stream in probe["streams"] if stream["codec_type"] == "video"]
    width = video_streams[0]["width"]
    height = video_streams[0]["height"]
    fps = int(eval(video_streams[0]["r_frame_rate"]))

    cap = (
        ffmpeg
        .input("target_video.mp4")
        .output('pipe:', format='rawvideo', pix_fmt='rgb24')
        .run_async(pipe_stdout=True)
    )

    writer = (
        ffmpeg
        .input('pipe:', format='rawvideo', pix_fmt='rgb24', s='{}x{}'.format(width//2, height//2), r=fps)
        .output("output.mp4", pix_fmt='yuv420p')
        .overwrite_output()
        .run_async(pipe_stdin=True)
    )

    while True:
        in_bytes = cap.stdout.read(width * height * 3)
        if not in_bytes:
            break
        in_frame = (
            np
            .frombuffer(in_bytes, np.uint8)
            .reshape([height, width, 3])
        )

        out_frame = Image.fromarray(in_frame).resize((width//2, height//2), Image.Resampling.BILINEAR)
        out_frame = np.array(out_frame) * 0.4

        writer.stdin.write(
            out_frame
            .astype(np.uint8)
            .tobytes()
        )

    writer.stdin.close()
    cap.wait()
    writer.wait()
結果をプロットすると次のようになります。
画質を変更する
ビットレート(画質)を明示的に調整できるのが、ffmpegの強みだと思います。このやり方はissueにありました。
outputの部分で、
    writer = (
        ffmpeg
        .input('pipe:', format='rawvideo', pix_fmt='rgb24', s='{}x{}'.format(width//2, height//2), r=fps)
        .output("output.mp4", pix_fmt='yuv420p', **{'b:v': '3000k'})
        .overwrite_output()
        .run_async(pipe_stdin=True)
    )
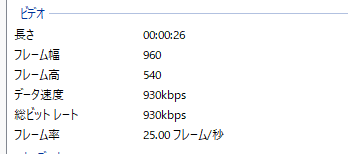
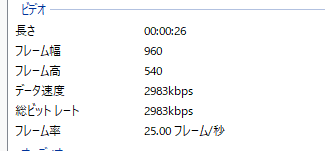
このようにするとビットレートを設定できます。この例では、3000kbpsを目標にエンコードしています。実際にエンコード結果を見ると、


上は映像ビットレートをなにも指定しなかったケース(先程の例)、下は映像ビットレートを3000kに指定したケースです。見ての通り、ビットレートが930kbps→2983kbpsに上がっています。
ffmpegのログを消したい
「quiet=True」を入れます
.run_async(pipe_stdout=True, quiet=True)
ライセンスについて
ffmpegというとライセンスが気になることもあると思います。「apt-get install ffmpeg」からインストールした場合、以下のようなライセンスになっていました。
ffmpeg -L
root@f4bc2c33f365:/src# ffmpeg -L
ffmpeg version 4.2.7-0ubuntu0.1 Copyright (c) 2000-2022 the FFmpeg developers
  built with gcc 9 (Ubuntu 9.4.0-1ubuntu1~20.04.1)
  configuration: --prefix=/usr --extra-version=0ubuntu0.1 --toolchain=hardened --libdir=/usr/lib/x86_64-linux-gnu --incdir=/usr/include/x86_64-linux-gnu --arch=amd64 --enable-gpl --disable-stripping --enable-avresample --disable-filter=resample --enable-avisynth --enable-gnutls --enable-ladspa --enable-libaom --enable-libass --enable-libbluray --enable-libbs2b --enable-libcaca --enable-libcdio --enable-libcodec2 --enable-libflite --enable-libfontconfig --enable-libfreetype --enable-libfribidi --enable-libgme --enable-libgsm --enable-libjack --enable-libmp3lame --enable-libmysofa --enable-libopenjpeg --enable-libopenmpt --enable-libopus --enable-libpulse --enable-librsvg --enable-librubberband --enable-libshine --enable-libsnappy --enable-libsoxr --enable-libspeex --enable-libssh --enable-libtheora --enable-libtwolame --enable-libvidstab --enable-libvorbis --enable-libvpx --enable-libwavpack --enable-libwebp --enable-libx265 --enable-libxml2 --enable-libxvid --enable-libzmq --enable-libzvbi --enable-lv2 --enable-omx --enable-openal --enable-opencl --enable-opengl --enable-sdl2 --enable-libdc1394 --enable-libdrm --enable-libiec61883 --enable-nvenc --enable-chromaprint --enable-frei0r --enable-libx264 --enable-shared
  libavutil      56. 31.100 / 56. 31.100
  libavcodec     58. 54.100 / 58. 54.100
  libavformat    58. 29.100 / 58. 29.100
  libavdevice    58.  8.100 / 58.  8.100
  libavfilter     7. 57.100 /  7. 57.100
  libavresample   4.  0.  0 /  4.  0.  0
  libswscale      5.  5.100 /  5.  5.100
  libswresample   3.  5.100 /  3.  5.100
  libpostproc    55.  5.100 / 55.  5.100
ffmpeg is free software; you can redistribute it and/or modify
it under the terms of the GNU General Public License as published by
the Free Software Foundation; either version 2 of the License, or
(at your option) any later version.

ffmpeg is distributed in the hope that it will be useful,
but WITHOUT ANY WARRANTY; without even the implied warranty of
MERCHANTABILITY or FITNESS FOR A PARTICULAR PURPOSE.  See the
GNU General Public License for more details.

You should have received a copy of the GNU General Public License
along with ffmpeg; if not, write to the Free Software
Foundation, Inc., 51 Franklin Street, Fifth Floor, Boston, MA 02110-1301 USA
GPLv2でした。少なくとも独自ライセンスは含まれないようです。
Shikoan's ML Blogの中の人が運営しているサークル「じゅ~しぃ~すくりぷと」の本のご案内
技術書コーナー
北海道の駅巡りコーナー

