Pillow/PIL ImageOpsチートシート

Pillow/PILの簡単かつ強力な処理を、実例とコードつきで解説します。
目次
ImageOpsについて
Pillow/PILにあるモジュールの1つ。ImageOpsの関数で簡単にいい感じに画像の補正や加工できます。この記事では2019年5月時点で用意されているImageOps以下の13個の処理を全て実行してみました。
また、ImageOps以下の処理はAuto Augmentでも使われており、Data Augmentationとしても有効であることが確認されています。ImageOpsの処理を頭の片隅に入れておけば、思いがけない精度向上効果があるかもしれません。
公式ドキュメント:https://pillow.readthedocs.io/en/3.0.x/reference/ImageOps.html
元ファイル・共通処理
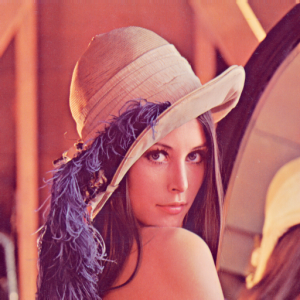
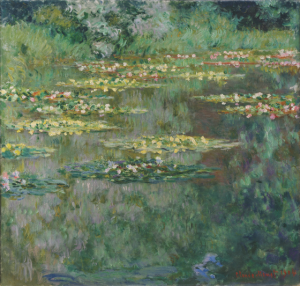
レナとモネの睡蓮を使います。それぞれ「lena.png」「monet.png」とします。
画像をタイルして表示するために「plot_all」という関数を作りました。
def plot_all(pil_list, text_list, suptitle, filename):
    assert len(pil_list) == len(text_list)
    plt.figure(figsize=(6,6))
    plt.subplots_adjust(left=0.02, right=0.98, top=0.90, bottom=0.02, wspace=0.05, hspace=0.2)
    n = int(np.ceil(np.sqrt(len(pil_list))))
    for i in range(len(pil_list)):
        ax = plt.subplot(n, n, i+1)
        img = np.asarray(pil_list[i], np.uint8)
        if pil_list[i].mode == "L":
            ax.imshow(img, cmap="gray")
        else:
            ax.imshow(img)
        ax.axis("off")
        ax.set_title(text_list[i])
    plt.suptitle(suptitle)
    plt.savefig("images/article_imageops_"+filename+".png")
(1) Auto Contast
カラーヒストグラムのスケールの自動調整。最大-最小の標準化(Normalization)や、最も暗い・明るい画素をCutoffする機能が備えられており、コントラストの強調に使える便利な関数。Cutoffはパーセント単位で指定し、デフォルトではCutoff=0(なし)となる。
def auto_contrast():
    with Image.open("lena.png") as base:
        vals = [0, 0.25, 0.5, 0.75, 1, 2, 5, 10]
        pils, text=[base], ["base"]
        for v in vals:
            pils.append(ImageOps.autocontrast(base, v))
            text.append("cutoff "+str(v)+"%")
        plot_all(pils, text, "Auto Contrast", "01_01")
    with Image.open("monet.png") as base:
        vals = [0, 0.25, 0.5, 0.75, 1, 2, 5, 10]
        pils, text=[base], ["base"]
        for v in vals:
            pils.append(ImageOps.autocontrast(base, v))
            text.append("cutoff "+str(v)+"%")
        plot_all(pils, text, "Auto Contrast", "01_02")
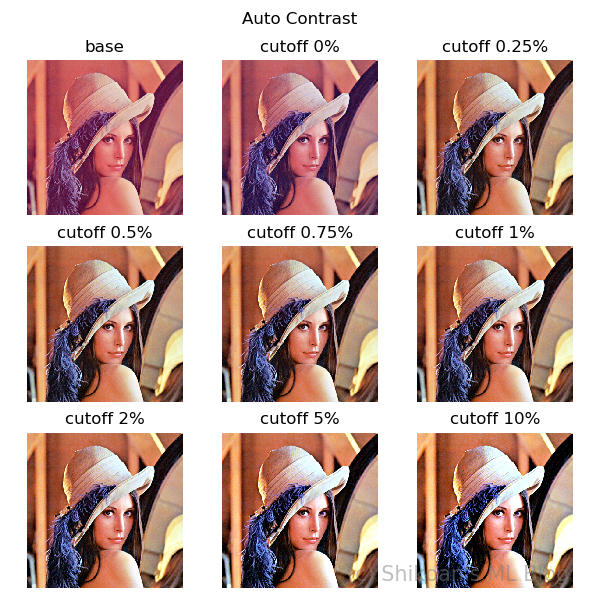
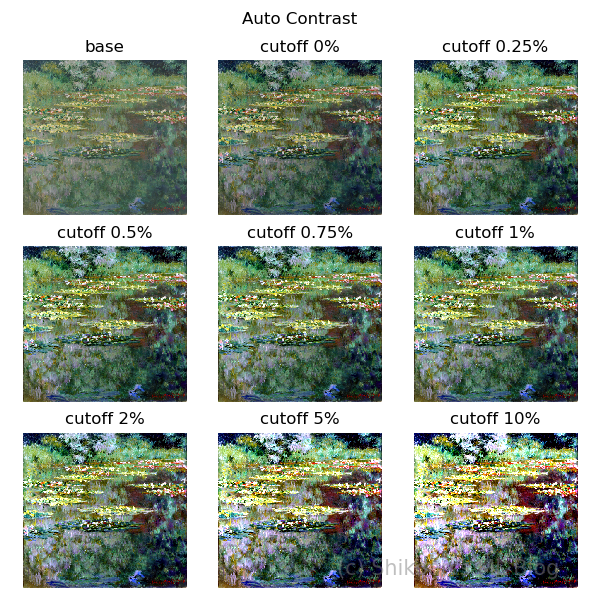
Cutoffの値を極端に上げていくと色がハレーションしていくのがわかる。
(2) Colorize
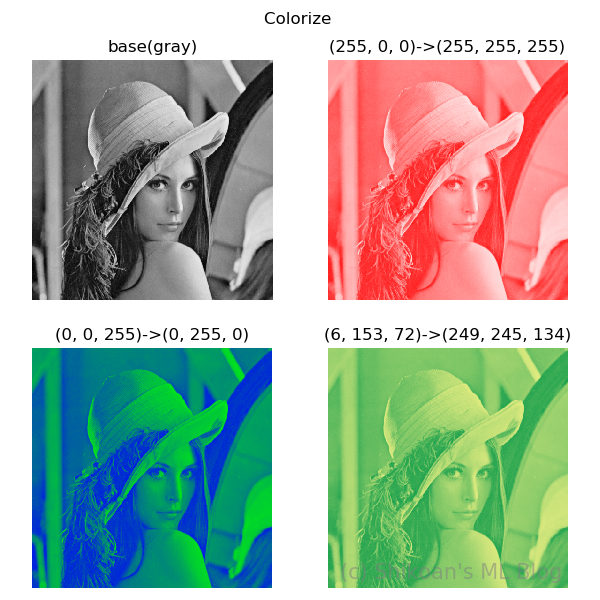
白黒画像のカラー化。入力をグレースケール画像とし、白、黒に対応するカラーコードを指定する。中間の色は自動で補完されるので、カラーグラデーションのようなこともできる。
def colorize():
    with Image.open("lena.png") as base:
        # colorizeの入力はグレースケールでなければならない
        base = base.convert("L")
        pils, text=[base], ["base(gray)"]
        starts = [(255,0,0), (0,0,255), (6, 153, 72)]#150,251,196
        ends = [(255,255,255), (0,255,0), (249,245,134)]
        for s, e in zip(starts, ends):
            pils.append(ImageOps.colorize(base, black=s, white=e))
            text.append(str(s)+"->"+str(e))
        plot_all(pils, text, "Colorize ", "02_01")
(3) Crop
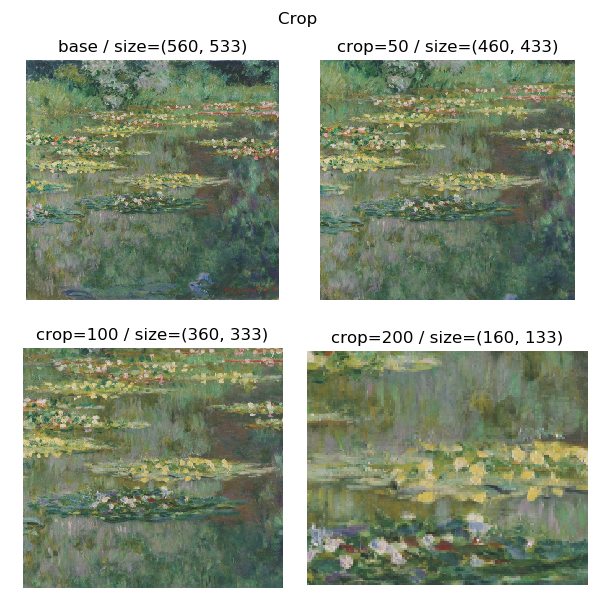
四辺の切り落とし。指定したピクセル数を四辺から切り落として、残った中心部分の画像を返す。クロップサイズを大きくすると、出力画像のサイズが下がる。ズームのように見えるがズームではなくトリミング。
def crop():
    with Image.open("monet.png") as base:
        pils, text=[base], ["base / size="+str(base.size)]
        vals = [50, 100, 200]
        for v in vals:
            im = ImageOps.crop(base, border=v)
            pils.append(im)
            text.append("crop="+str(v)+" / size="+str(im.size))
        plot_all(pils, text, "Crop ", "03_01")
(4) Deform
もとの四角形の4点に対して、移動先を指定して(メッシュ)それに対応する変換を行う処理。やっていることは(パースペクティブ)射影変換の拡張で、補完処理も入り相当表現の幅が広い。また複数エリアについて、移動先を別々に指定して一気に変換ということもできる。ただし、ここらへんを公式ドキュメントで全く解説していないのでかなり不親切。
この変換はちょっと特殊で、「getmesh」という関数があるクラスが必要になる。最も簡単な例で、恒等変換(出力が同じ)になるのは以下の通り。
class Deformer(object):
    def __init__(self, case):
        self.case = case

    def getmesh(self, im):
        x, y = im.size
        return [((0, 0, x, y), (0, 0, 0, y, x, y, x, 0))]
このようにgetmeshという関数が含まれる「Deformer」(クラス名は何でも良い)を定義する。getmeshの引数はPillowのImageインスタンスとなる。
また、getmeshの返り値は((移動前のBoundingBox), (移動先の4点の座標))で表されるTupleをリスト形式として積み上げたものとなる。もし、変換が1種類でよければこのTupleは1個でよいし、複数の変換を行いたいのなら複数重ねることができる。各点の座標は、
$$((x_0, y_0, x_1, y_1), (x_0′, y_0′, x_1′, y_1′, x_2′, y_2′, x_3′, y_3′)) $$
で指定する。全て絶対座標で指定する。移動前=「左上、右下」の順、移動先=「左上、左下、右下、右上(恒等変換の場合、左上から反時計回り)」の順で指定する。恒等変換の場合は、
- 左上:$(0, 0)$
- 左下:$(0, y)$
- 右下: $(x, y)$
- 右上: $(x, 0)$
の対応となるので、先程のコードでOK。移動先の点の順序は、画像を捻じ曲げるような変換をする場合順序が変わることがあるが、移動前の位置を基準に入力する。
Deformを8ケース試してみた。
class Deformer(object):
    def __init__(self, case):
        self.case = case

    def getmesh(self, im):
        x, y = im.size
        # BoundingBox(x1,y1,x2,y2), Quad(x1,y1,…,x4,y4)のTuple
        # Quadは左上の点から反時計回り
        if self.case == 0:
            # 恒等変換(反時計回り)
            return [((0, 0, x, y), (0, 0, 0, y, x, y, x, 0))]
        elif self.case == 1:
            # 左に90°回転(時計回り)
            return [((0, 0, x, y), (0, 0, x, 0, x, y, 0, y))]
        elif self.case == 2:
            # 部分的に左に90°回転
            qx, qy = int(x/4), int(y/4)
            return [((qx, qy, 3*qx, 3*qy), (qx, qy, 3*qx, qy, 3*qx, 3*qy, qx, 3*qy))]
        elif self.case == 3:
            # 恒等変換の2番目と3番目の点を逆にする
            return [((0, 0, x, y), (0, 0, x, y, 0, y, x, 0))]
        elif self.case == 4:
            # 恒等変換の1番目と4番目の点を逆にする
            return [((0, 0, x, y), (x, 0, 0, y, x, y, 0, 0))]
        elif self.case == 5:
            # 右側だけ縦方向に拡大
            return [((0, 0, x, y), (0, 0, 0, y, x, 0.6*y, x, 0.4*y))]
        if self.case == 6:
            # 上だけ横方向に拡大
            return [((0, 0, x, y), (0.4*x, 0, 0, y, x, y, 0.6*x, 0))]
        elif self.case == 7:
            # 2つの変換を合成、上下を横方向に拡大
            hx, hy = int(x/2), int(y/2)
            return [((0, 0, x, hy), (0.4*x, 0, 0, hy, x, hy, 0.6*x, 0)),
                    ((0, hy, x, y), (0, hy, 0.4*x, y, 0.6*x, y, x, hy))]
        elif self.case == 8:
            # 4つの変換を合成、順に右上は上、左下は左、右上は右、右下は下を拡大
            hx, hy = int(x/2), int(y/2)
            return [((0, 0, hx, hy), (0.5*hx, 0, 0, hy, hx, hy, 0.5*hx, 0)),
                    ((0, hy, hx, y), (0, 1.5*hy, 0, 1.5*hy, hx, y, hx, hy)),
                    ((hx, 0, x, hy), (hx, 0, hx, hy, x, 0.5*hy, x, 0.5*hy)),
                    ((hx, hy, x, y), (hx, hy, 1.5*hx, y, 1.5*hx, y, x, hy))]

def deform():
    with Image.open("lena.png") as base:
        pils, text = [], []
        for i in range(9):
            pils.append(ImageOps.deform(base, deformer=Deformer(i)))
            text.append("Case "+str(i))
        plot_all(pils, text, "Deform", "04_01")

回転系はアフィン変換でもできるが、それを拡張した台形(射影)変換が基本になる。さらに射影変換よりもっと複雑な変換・補完や、複数の変換の合成といった、非常に高度な処理ができる。ぜひ使いこなしたい。
(5) Equalize
Auto Contrastと似たヒストグラム系の処理の処理だが、RGBで分布が均一化される。ただし、Auto Contrastと違うのは、マスク領域を指定できる点。マスクを使うと特定の領域のカラーヒストグラムを基準に、均一化処理を行うことが可能。
def equalize():
    pils, text = [], []
    with Image.open("lena.png") as base:
        pils, text = [base], ["base"]
        # 全体を平均化
        pils.append(ImageOps.equalize(base))
        text.append("equalize all")
        # マスク(左上のカラーヒストグラムをベースに平均化)
        with Image.new("L", base.size) as mask:
            draw = ImageDraw.Draw(mask)
            draw.rectangle((0, 0, mask.width/4, mask.height/4), fill=255)
            pils.append(ImageOps.equalize(base, mask=mask))
            text.append("equalize top-left mask")
        # マスク(中央カラーヒストグラムをベースに平均化)
        with Image.new("L", base.size) as mask:
            draw = ImageDraw.Draw(mask)
            draw.rectangle((mask.width/3, mask.height/3, mask.width*2/3, mask.height*2/3), fill=255)
            pils.append(ImageOps.equalize(base, mask=mask))
            text.append("equalize center mask")

    plot_all(pils, text, "Equalize", "05_01")
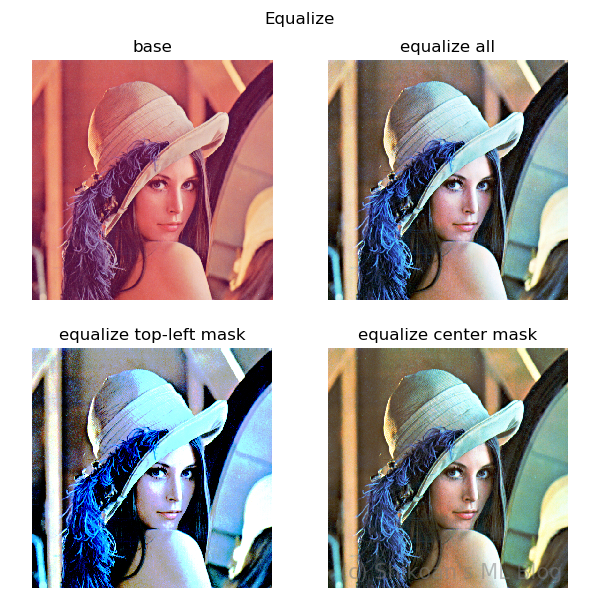
右上の図は全体で均一化したケース、色合いが大きく変わっているのがわかる。
左下の図は、画像の左上の1/4の領域のみのカラーヒストグラムだけを注目し、均一化した結果。小さい領域のみ注目しているので色数が少なく、結果的にカラーノイズが大きく増えているのがわかる。
右下の図は、画面中央のみのカラーヒストグラムに注目して均一化した結果。全体に注目するより、肌色の成分が多い領域に注目して計算しているので、背景の木材がやや肌色じみた変換結果となっている。
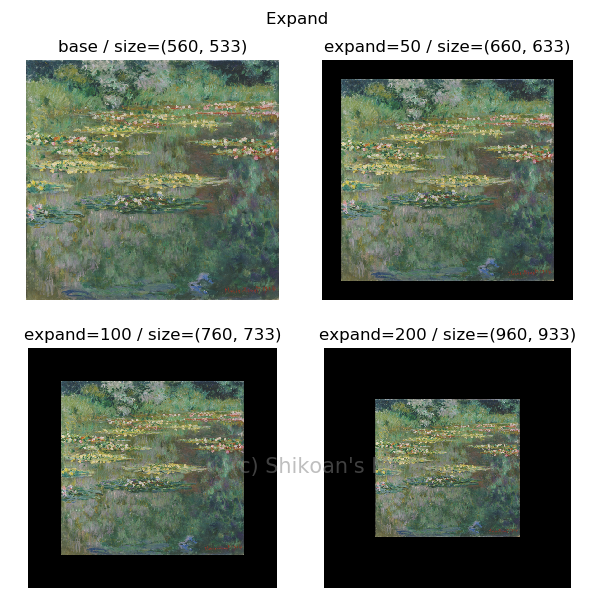
(6) Expand
Cropの逆で、画像の四辺にPaddingを入れる処理。fill=で埋める色を指定できる(デフォルトは黒)。
def expand():
    with Image.open("monet.png") as base:
        pils, text=[base], ["base / size="+str(base.size)]
        vals = [50, 100, 200]
        for v in vals:
            im = ImageOps.expand(base, border=v)
            pils.append(im)
            text.append("expand="+str(v)+" / size="+str(im.size))
        plot_all(pils, text, "Expand ", "06_01")
(7) Fit
センタリングしつつ指定したサイズになるように切り出す処理。sizeのパラメーターが必須。centeringのパラメーターは画像のどこを中心に切り出すかというオプションで、デフォルトは(0.5, 0.5)。
def fit():
    with Image.open("lena.png") as base:
        pils, text=[base], ["base s="+str(base.size)]
        size = [(100, 100), (100, 200), (200, 100),
                (100, 100), (100, 200), (200, 100),
                (100, 200), (200, 100)]
        center = [(0.5, 0.5), (0.5, 0.5), (0.5, 0.5),
                  (0.2, 0.7), (0.2, 0.7), (0.2, 0.7),
                  (0.7, 0.2), (0.7, 0.2)]
        for s, r in zip(size, center):
            im = ImageOps.fit(base, s, method=Image.LANCZOS, centering=r)
            pils.append(im)
            text.append("s="+str(im.size)+" r="+str(r))
        plot_all(pils, text, "Fit", "07_01")
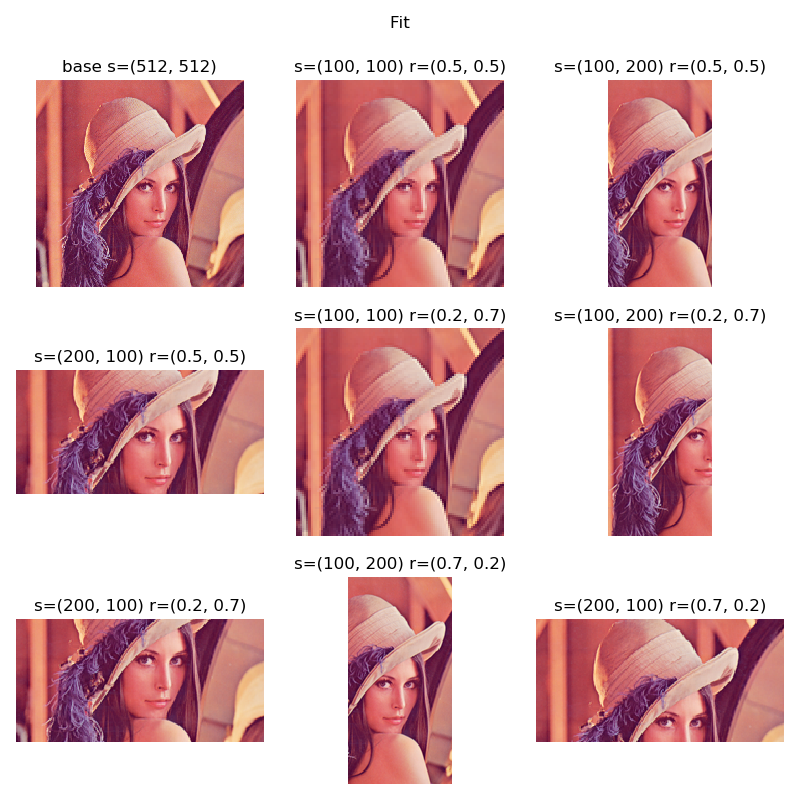
centeringの2番目(y)を低い値にすると頭寄り、大きい値にすると胸よりのトリミングになる。
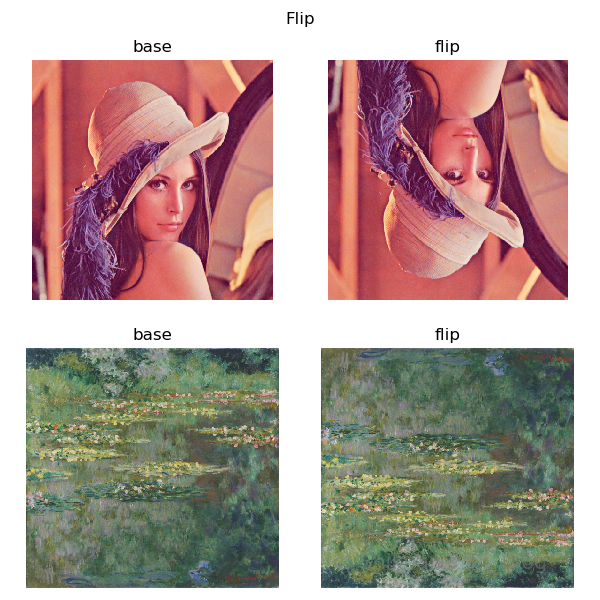
(8) Flip
上下反転。Data AugmentationではVertical flipと言われる処理。
def flip():
    with Image.open("lena.png") as base:
        pils, text=[base], ["base"]
        pils.append(ImageOps.flip(base))
        text.append("flip")
    with Image.open("monet.png") as base:
        pils.append(base)
        text.append("base")
        pils.append(ImageOps.flip(base))
        text.append("flip")
    plot_all(pils, text, "Flip", "08_01")
(9) Gray scale
グレースケール化
def grayscale():
    with Image.open("lena.png") as base:
        pils, text=[base], ["base"]
        pils.append(ImageOps.grayscale(base))
        text.append("grayscale")
    with Image.open("monet.png") as base:
        pils.append(base)
        text.append("base")
        pils.append(ImageOps.grayscale(base))
        text.append("grayscale")
    plot_all(pils, text, "Grayscale", "09_01")

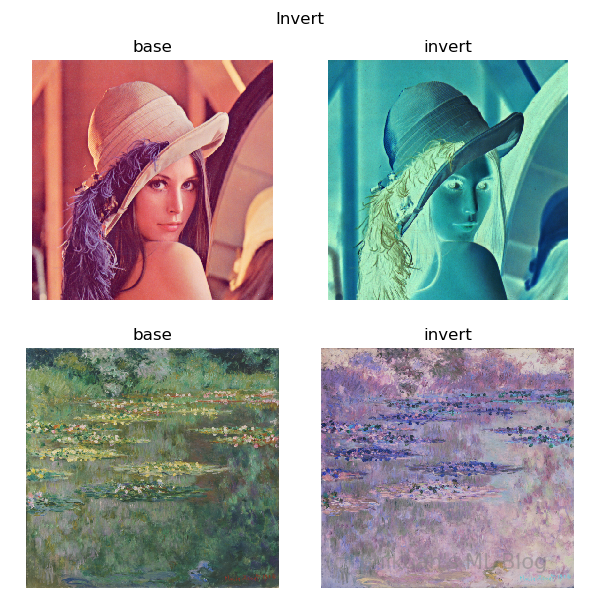
(10) Invert
色の反転を行う。全ての画素を255から引くのと同じ。
def invert():
    with Image.open("lena.png") as base:
        pils, text=[base], ["base"]
        pils.append(ImageOps.invert(base))
        text.append("invert")
    with Image.open("monet.png") as base:
        pils.append(base)
        text.append("base")
        pils.append(ImageOps.invert(base))
        text.append("invert")
    plot_all(pils, text, "Invert", "10_01")
(11) Mirror
左右反転。Data AugmentationではHorizontal Flipと言われるおなじみの処理。
def mirror():
    with Image.open("lena.png") as base:
        pils, text=[base], ["base"]
        pils.append(ImageOps.mirror(base))
        text.append("mirror")
    with Image.open("monet.png") as base:
        pils.append(base)
        text.append("base")
        pils.append(ImageOps.mirror(base))
        text.append("mirror")
    plot_all(pils, text, "Mirror", "11_01")

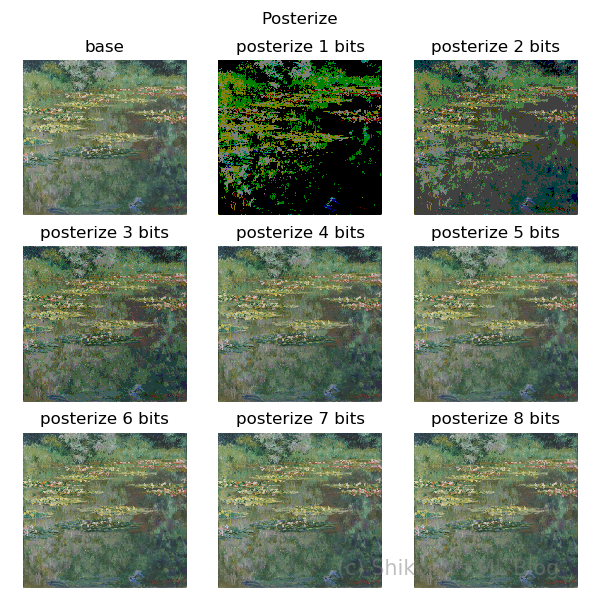
(12) Posterize
ポスター化(減色)。カラーチャンネル単位で指定したビット数に減色(量子化)する。1-8ビットで指定する。8ビットだと256^3色表現できるため、元の画像が24ビットでは変換前と同じになる。
def posterize():
    with Image.open("monet.png") as base:
        pils, text=[base], ["base"]
        for i in range(1,9):
            pils.append(ImageOps.posterize(base, i))
            text.append("posterize "+str(i)+" bits")
    plot_all(pils, text, "Posterize", "12_01")
(13) Solarize
スレッショルドのついたInvert(カラー反転)。RGBの各ピクセル値がスレッショルドより大きければ反転、そうでなければ反転しないという操作を表す。
def solarize():
    with Image.open("lena.png") as base:
        pils, text = [], []
        for i in range(9):
            pils.append(ImageOps.solarize(base, i*32))
            text.append("solarize th="+str(i*32))
    plot_all(pils, text, "Solarize", "13_01")
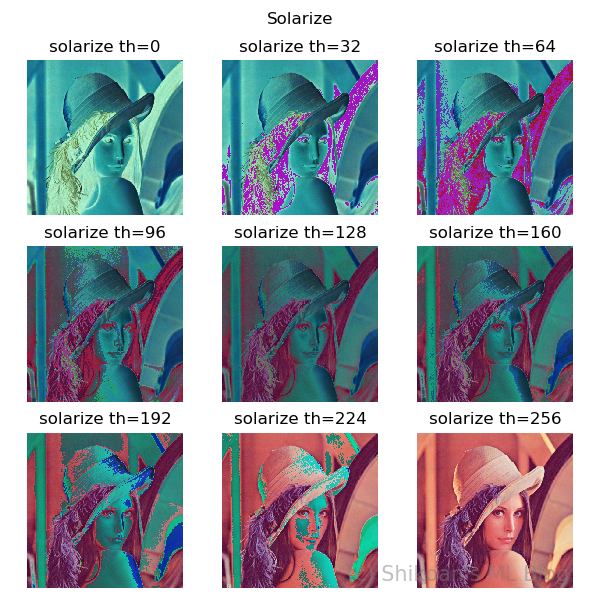
スレッショルドが256のとき、反転は一切起こらないのでもとの画像と一致する。逆にスレッショルドが0なら、全てのピクセルで反転するのでInvertと同じ結果になる。
Shikoan's ML Blogの中の人が運営しているサークル「じゅ~しぃ~すくりぷと」の本のご案内
技術書コーナー
北海道の駅巡りコーナー