
訓練済みYOLOXでサクッと推論したい場合に使える方法


物体検出を使いたい場合、カスタムデータで訓練することなく、COCO Pretrainedモデルによる推論だけで事足りることも多々あります。2021年最新モデルのYOLOXを使って、サクッと推論する方法を見ていきましょう。
目次
概略
方針は、公式で提供しているONNXモデルを使います。この方法はGPU推論は対応していません。想定はちょっとした枚数(~数千枚)の画像を1回推論するだけなので、あまり急いで推論する必要ないケースです。
公式のONNXコードをいじっただけです。argparseは消して決め打ちしています。
環境構築
GitからCloneしてもいいですが、pipからもインストールできるようになっていたのでこっちが簡単でしょう。
pip install yolox
訓練済みモデルのダウンロード
公式ページからURLを取得(ダウンロード)します。YOLOX-Nano~YOLOX-XまでONNXモデルがありますが、今回はYOLOX-Sを例にとります。
https://github.com/Megvii-BaseDetection/YOLOX/tree/main/demo/ONNXRuntime
wget https://github.com/Megvii-BaseDetection/YOLOX/releases/download/0.1.1rc0/yolox_s.onnx
推論コード
import cv2
import numpy as np

import onnxruntime

from yolox.data.data_augment import preproc as preprocess
from yolox.data.datasets import COCO_CLASSES
from yolox.utils import multiclass_nms, demo_postprocess, vis

# 画像の読み込み、前処理
input_shape = (640, 640)
origin_img = cv2.imread("path-to-your-inference-image.jpg")
img, ratio = preprocess(origin_img, input_shape)

# ONNXセッション
session = onnxruntime.InferenceSession("yolox_s.onnx")

# 推論+後処理
ort_inputs = {session.get_inputs()[0].name: img[None, :, :, :]}
output = session.run(None, ort_inputs)
predictions = demo_postprocess(output[0], input_shape, p6=False)[0]

# xyxyへの変換+NMS
boxes = predictions[:, :4]
scores = predictions[:, 4:5] * predictions[:, 5:]

boxes_xyxy = np.ones_like(boxes)
boxes_xyxy[:, 0] = boxes[:, 0] - boxes[:, 2]/2.
boxes_xyxy[:, 1] = boxes[:, 1] - boxes[:, 3]/2.
boxes_xyxy[:, 2] = boxes[:, 0] + boxes[:, 2]/2.
boxes_xyxy[:, 3] = boxes[:, 1] + boxes[:, 3]/2.
boxes_xyxy /= ratio
dets = multiclass_nms(boxes_xyxy, scores, nms_thr=0.45, score_thr=0.1)
if dets is not None:
    final_boxes, final_scores, final_cls_inds = dets[:, :4], dets[:, 4], dets[:, 5]
    # BoundingBoxを描画する場合
    inference_img = vis(origin_img, final_boxes, final_scores, final_cls_inds,
                        conf=0.3, class_names=COCO_CLASSES)
    cv2.imwrite("path-to-output-image.jpg", inference_img)
実際に使うときは、「path-to-your-inference-image.jpg」と「path-to-output-image.jpg」を変えればOKです。モデルを変えたときは「yolo_s.onnx」も変更します。
YOLOXの推論コードはOpenCVがベースなので、RGBではなくBGRになっています。matplotlibで表示する際や、PILを読み込みライブラリとして使う際は注意してください。
結果
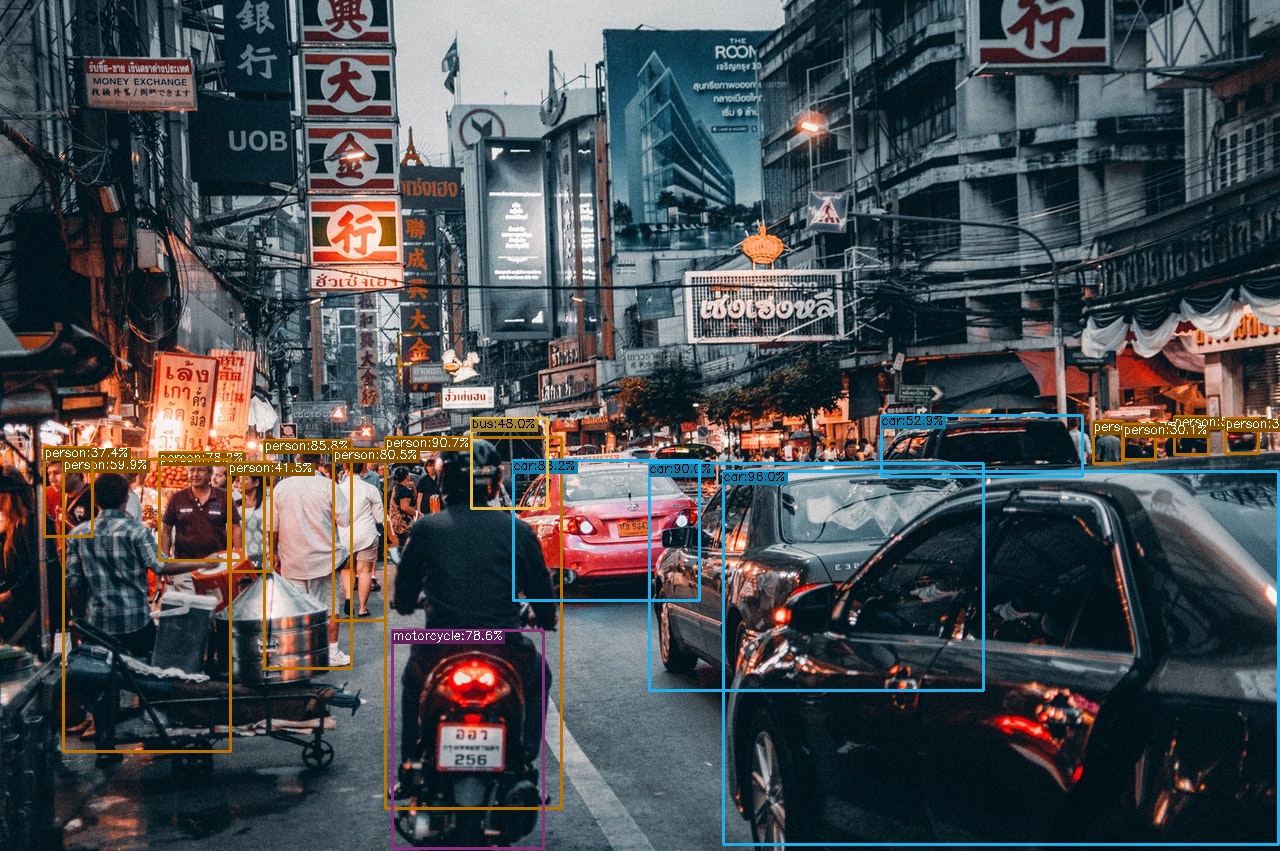
適当なフリー素材を推論してみましょう。

推論結果を可視化したものはこのようになります。手軽な割にいい感じですね。
数値的にほしい場合
BoundingBoxの座標やクラスインデックスが数値的にほしい場合も多々あります。これはコード内部の「final_boxes, final_scores, final_cls_inds 」に格納されています。最初の5件をそれぞれ見てみましょう。
print(final_boxes[:5,:])
print(final_scores[:5])
print(final_cls_inds[:5])
[[ 723.10986328  471.74337769 1278.9473877   844.46252441]
 [ 385.98516846  437.86859131  561.94281006  808.46868896]
 [ 649.46905518  463.26837158  983.67938232  690.22320557]
 [ 513.49816895  460.76550293  699.86547852  600.08203125]
 [ 264.43399048  440.13293457  351.78012085  668.63574219]]
[0.95963991 0.90678704 0.90024942 0.88179719 0.85759586]
[2. 0. 2. 2. 0.]
上からBounding Boxの座標(左上x、左上y、右下x、右下y)、Bounding Boxの信頼度、クラスのインデックスを指します。インデックスがどれに対応するのかというとCOCO_CLASSESです(このモデルはMSCOCOというデータセットで訓練されているため)
print(COCO_CLASSES)
#('person', 'bicycle', 'car', 'motorcycle', 'airplane', 'bus', 'train', 'truck', 'boat', 'traffic light', 'fire hydrant', 'stop sign', 'parking meter', 'bench', 'bird', 'cat', 'dog', 'horse', 'sheep', 'cow', 'elephant', 'bear', 'zebra', 'giraffe', 'backpack', 'umbrella', 'handbag', 'tie', 'suitcase', 'frisbee', 'skis', 'snowboard', 'sports ball', 'kite', 'baseball bat', 'baseball glove', 'skateboard', 'surfboard', 'tennis racket', 'bottle', 'wine glass', 'cup', 'fork', 'knife', 'spoon', 'bowl', 'banana', 'apple', 'sandwich', 'orange', 'broccoli', 'carrot', 'hot dog', 'pizza', 'donut', 'cake', 'chair', 'couch', 'potted plant', 'bed', 'dining table', 'toilet', 'tv', 'laptop', 'mouse', 'remote', 'keyboard', 'cell phone', 'microwave', 'oven', 'toaster', 'sink', 'refrigerator', 'book', 'clock', 'vase', 'scissors', 'teddy bear', 'hair drier', 'toothbrush')
したがって、「インデックス=0は人間、インデックス=2は車」を指します。
Shikoan's ML Blogの中の人が運営しているサークル「じゅ~しぃ~すくりぷと」の本のご案内
技術書コーナー
北海道の駅巡りコーナー