EVA-CLIPをOpenCLIPで使う

EVA-CLIPがOpenCLIPから使えるようになっていたので試してみました。ViT-L/14相当のモデルでImageNetのゼロショット精度が80%越えでなかなかやばい結果となりました。
目次
はじめに
以前EVAという論文を紹介しましたが、そのCLIPがOpenCLIPから利用できるようになっていたので試してみます。
- EVA: Exploring the Limits of Masked Visual Representation Learning at Scale
- EVA-02: A Visual Representation for Neon Genesis
OpenCLIPでの実装はこちらから。引数にわたすモデル名やPretrained Weightsもこちらにあります。
https://github.com/mlfoundations/open_clip/blob/main/src/open_clip/pretrained.py
EVAシリーズ
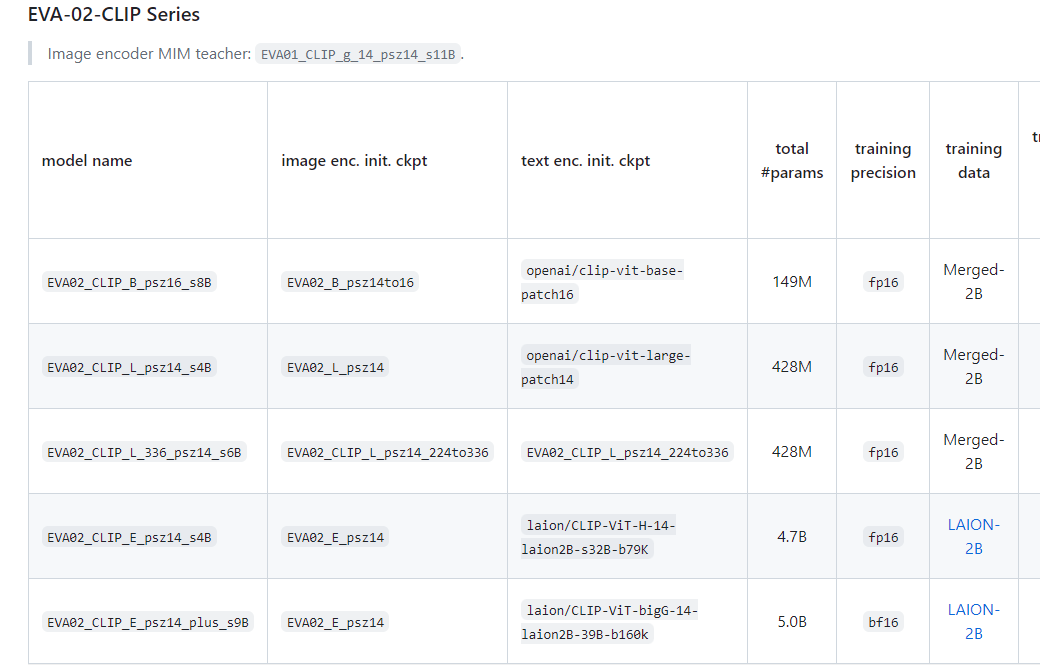
オリジナルのEVAの論文ではモデルがいくつか用意されています。
https://github.com/baaivision/EVA/tree/master/EVA-CLIP
今回使ってみるのは、「EVA02_CLIP_L_336_psz14_s6B」というモデルで、428Mとまあまあ小型ながらImageNetのゼロショット精度が80.4%となかなか強いスペックです。EVA-02シリーズです。

前提
OpenCLIPをインストールします
pip install open_clip_torch
timmが古いとEVAをダウンロードできないのでアップグレードしておきます。
pip install --upgrade timm
ImageNetのゼロショット分類
カタログスペックが本当に出るのか確かめてみます。コードは以前の記事で使用したものを転用しています。ディレクトリのデータ配置はこちらを参照してください。
from imagenet_zeroshot_data import openai_imagenet_template, imagenet_classnames
import os
import glob
import open_clip
import torch
from PIL import Image
from tqdm import tqdm
import numpy as np


def evaluate_zeroshot():
    files = sorted([x.replace("\\", "/") for x in glob.glob("val/**/*", recursive=True) if os.path.isfile(x)])
    dirnames = sorted([x.replace("\\", "/").split("/")[-1] for x in glob.glob("val/*")])
    y_true = [dirnames.index(x.split("/")[1]) for x in files]

    prompts = []
    for cname in imagenet_classnames:
        item = []
        for func in openai_imagenet_template:
            item.append(func(cname))
        prompts.append(item)

    print(len(y_true), len(files)) # 50000 50000
    print(len(prompts), len(prompts[0])) # 1000 80

    device = "cuda"

    model, _, transform = open_clip.create_model_and_transforms(
        model_name='EVA02-L-14-336',
        pretrained='merged2b_s6b_b61k',
        device=device, precision="fp32"
    )
    tokenizer = open_clip.get_tokenizer('EVA02-L-14-336')

    text_embeddings = []
    for item in tqdm(prompts):
        text = tokenizer(item).to(device)
        with torch.no_grad():
            text_features = model.encode_text(text)
            text_features /= text_features.norm(dim=-1, keepdim=True)
            text_embeddings.append(text_features.mean(dim=0, keepdim=True))
    text_embeddings = torch.cat(text_embeddings, dim=0)
    text_embeddings /= text_embeddings.norm(dim=-1, keepdim=True)
    print(text_embeddings.shape) # torch.Size([1000, 512])

    image_embeddings = []
    with torch.no_grad():
        for f in tqdm(files):
            image = transform(Image.open(f)).unsqueeze(0).to(device)
            image_features = model.encode_image(image)
            image_features /= image_features.norm(dim=-1, keepdim=True)
            image_embeddings.append(image_features)
    image_embeddings = torch.cat(image_embeddings, dim=0)

    simiralities = image_embeddings @ text_embeddings.T
    pred_classes = simiralities.cpu().numpy().argmax(axis=-1)
    # Image-Textの精度
    print("Image to text Zero Shot")
    print(np.mean(pred_classes == np.array(y_true)))

    dec_indices = np.argsort(simiralities.cpu().numpy(), axis=0)[::-1, :]

    text_retrieval = []
    for class_idx in range(dec_indices.shape[1]):
        correct_ans = np.arange(len(y_true))[np.array(y_true)==class_idx]
        item = []
        for ans_idx in correct_ans:
            item.append(np.any(dec_indices[:50, class_idx]==ans_idx))
        text_retrieval.append(np.array(item).mean())
    # Text-ImageのRecall@50
    print("Text to Image Recall@50")
    print(np.array(text_retrieval).mean())

if __name__ == "__main__":
    evaluate_zeroshot()
単純なImage2Textのゼロショット精度と、Text2ImageのRecall@50を見ています。後者は入力テキストに対してターゲットのクラスの画像が上位50個の中に存在すれば正解とみなします。
結果
OpenAIのViT-L-14-336と比較した結果は以下の通りでした。
| Type | Architecture | Image2Text Zeroshot | Text2Image Recall@50 |
|---|---|---|---|
| OpenAI | ViT-L/14 336 | 76.56% | 63.85% |
| EVA | EVA02-L-14-336 | 80.39% | 68.41% |
いずれにおいてもEVA-02が勝利しました。つっよ…
処理時間はほぼOpenAIのViT-Lとほぼ変わらなく、5万枚処理するのにOpenAIが42分、EVAが48分でした。いずれもforループで書いた雑なコード(GPUの使用率を100%にしていない)ので、DataLoaderなどを使って高速化すればもっと速くなるはずです。
OpenAIのモデルも相当いいですが(いい理由はおそらくOpenAIの謎のデータセット構築。ノイジーなデータをある程度前処理していると思われる。EVAはこういったこと特にしていない)、ViT-L/14相当で80%越えはやばいですね…
Linear-Probeもできますが、ImageNetの訓練データ全体のEmbeddingを求めるのがだるいので割愛します。
まとめ
OpenCLIPから手軽にEVAを利用できた。内部で呼び出しているのはtimmなので、timmさえ使えればあとはどうにでもなりそうです。欲を言えばtransformersからも利用できるようになると嬉しい。
Shikoan's ML Blogの中の人が運営しているサークル「じゅ~しぃ~すくりぷと」の本のご案内
技術書コーナー
北海道の駅巡りコーナー

