
Text4Visを使ったオープンセットな動画認識をやってみた


オープンセットな行動認識のできるText4VisというモデルをHMDB51で試し撃ちしてみました。訓練済みモデルが公開されており、すぐ利用することができます。
目次
はじめに
Text4VisというVision&Languageの動画認識モデルがあります。
コード:https://github.com/whwu95/Text4Vis
論文:https://arxiv.org/pdf/2207.01297.pdf
Papers with codeによると、2023年1月時点でのActivityNetでのZeroshot精度がSoTA、KineticsでZeroshot精度が2位となかなかなものです。
このモデルのコードと訓練済みモデルが公開されていたので、Zeroshot評価(オープンセット)の部分だけを再現してみます。
Text4Visとは
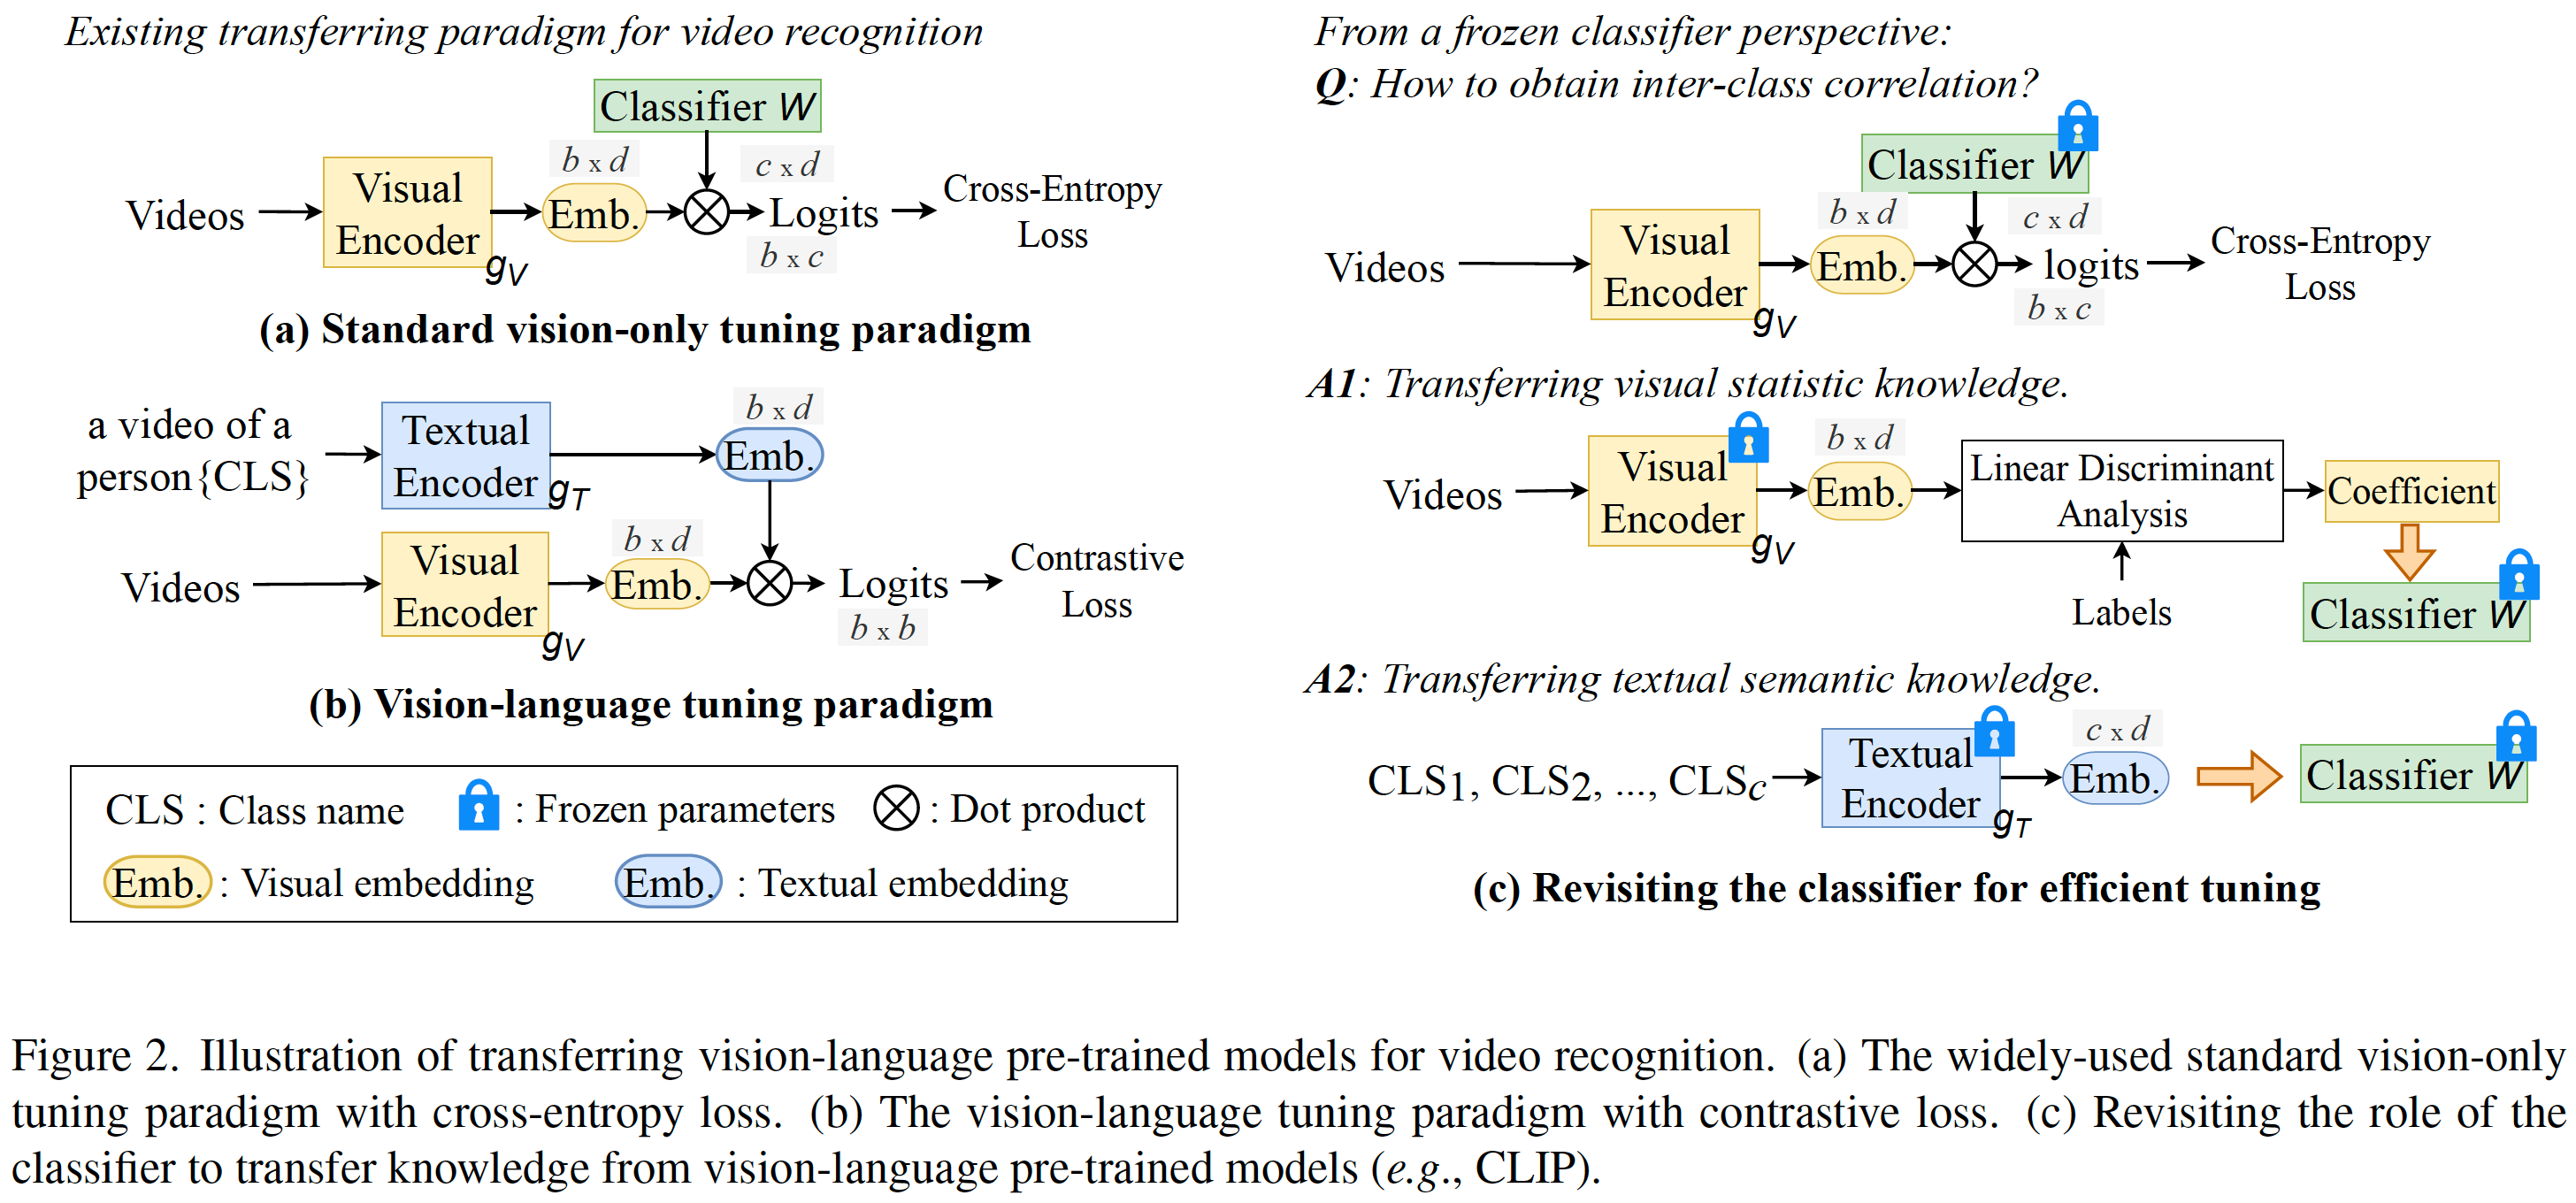
訓練済みCLIPをベースに、テキストエンコーダーを利活用して、ダウンストリームタスクに適応するモデルです。動画認識もできて、フレーム間の演算もいい感じにやってくれます(CLIPだけだとフレーム間の演算はしてくれない)。
動画認識のソースを読んでいると、Text4Visでは2種類のモデルを使っていました。
- OpenAIのCLIP:TextEncoderの部分をメインに使っています
- Text4Vis:ImageEncoderとフレーム間の集約の部分。ImageEncoderもおそらくOpenAIのCLIPが元
環境構築
Google ColabのGPUインスタンスでの実行を想定しています。これはZeroshot評価に必要なライブラリを最低限突っ込んだだけなので、訓練までやるとおそらくもっとライブラリは必要です。
HMDB51という動画での行動認識のデータセットを評価に使います。rarで圧縮されているので、unrarを追加します。
!apt-get install unrar
CLIPに必要なftfyと、動画の読み込みに必要なdecordを追加します。
!pip install decord ftfy
Text4Visをクローンします。
!git clone https://github.com/whwu95/Text4Vis
%cd Text4Vis
Text4Visの訓練済みモデルをダウンロードします。論文ではViT-L-14で評価していますが、計算が重いのでViT-B-32を使います。Kinetics400で訓練されたものです。
!wget https://github.com/whwu95/Text4Vis/releases/download/v1/k400-vitb-32-f8.pt
HMDB51のダウンロード
動画での行動認識のデータセットとして手軽に扱えるのがHMDB51です。これをダウンロードして展開していきます。
データセットの展開先ディレクトリを作成します。
!mkdir hmdb51
!mkdir hmdb51/videos
データセットrarとTrain Test Splitが記されたrarをダウンロードします。
!wget http://serre-lab.clps.brown.edu/wp-content/uploads/2013/10/hmdb51_org.rar -P hmdb51/videos
!wget http://serre-lab.clps.brown.edu/wp-content/uploads/2013/10/test_train_splits.rar -P hmdb51
展開します。
%cd hmdb51
!unrar x test_train_splits.rar
%cd videos
!unrar x hmdb51_org.rar
ディレクトリごとのrarが入れ子ででてくるのでさらに展開します。ガバってhmdb51_org.rarが二度解凍されるので、「A」でもおして適当に上書きします。
import glob

files = sorted(glob.glob("*.rar"))
for f in files:
    !unrar x {f}
HMDB51のディレクトリに戻ります。
%cd ..
公式のTrain Test Splitからテストデータだけ抜き出します。ID=2がテストデータです。
import os

files = sorted(glob.glob("testTrainMulti_7030_splits/*.txt"))
test_videos = []
for f in files:
    with open(f) as fp:
        for line in fp.readlines():
            split = line.split(" ")
            if split[1] == "2":
                x = os.path.basename(f).replace(".txt", "")
                for i in range(1, 4):
                    x = x.replace(f"_test_split{i}", "")
                test_videos.append(f"videos/{x}/{split[0]}")

test_files = {}
for f in test_videos:
    splits = f.split("/")
    key = splits[1].replace("_", " ")
    if key in test_files.keys():
        test_files[key].append(f)
    else:
        test_files[key] = [f]

print("num test data")
for k, v in test_files.items():
    print(k, len(v))
51個のクラス単位のデータ数を見ると、各クラス90個の動画があります。
num test data
brush hair 90
cartwheel 90
catch 90
chew 90
clap 90
climb stairs 90
climb 90
dive 90
draw sword 90
: : :
walk 90
wave 90
Text4Visのディレクトリに戻ります。
%cd ..
訓練済みモデルのロード
必要なライブラリをロードします。ここで読んでいるCLIPは、Text4Vis内にあるCLIPで、OpenAIのCLIPとは若干返り値のフォーマットがアレンジされています。
import clip
import torch
from modules.video_clip import video_header, VideoCLIP
import torchvision
def update_dict(dict):
    new_dict = {}
    for k, v in dict.items():
        new_dict[k.replace('module.', '')] = v
    return new_dict

clip_model, clip_state_dict = clip.load(
    "ViT-B/32",
    device='cuda', jit=False,
    internal_modeling=False,
    T=8,
    dropout=0.0,
    emb_dropout=0.0,
    pretrain=True,
    joint_st=False) # Must set jit=False for training  ViT-B/32

video_head = video_header(
    "Transf",
    clip_state_dict)

model_full = VideoCLIP(clip_model, video_head, 8)
checkpoint = torch.load("k400-vitb-32-f8.pt", map_location='cuda')
print('load model: epoch {}'.format(checkpoint['epoch']))

model_full.load_state_dict(update_dict(checkpoint['model_state_dict']))
model_full = model_full.cuda()
このモデル最初は混乱するのですが、8個の画像バッチを1つのサンプルとして扱うように処理します。
例えば、画像のバッチサイズが32で解像度が224×224の場合、(32, 3, 224, 224)のshapeのテンソルがInputになります。これをImageEncoderに入れて埋め込み量を得ると、(32, 512)というテンソルになります(512は隠れ層の次元)。
CLIPならこのままドット積をとって終わりなのですが、Text4Visの場合は、N個のバッチを1つのサンプルとして扱う(具体的には、複数フレームの動画を1サンプルとして扱う)ため、N=8なら、(4, 512)となります。
今回はバッチサイズを1で計算するよう、簡易化したコードです。公式のコードを見るとバッチサイズが1より大きい想定で実装しているため、もう少し複雑な処理しています。
前処理を定義します。
input_mean = [0.48145466, 0.4578275, 0.40821073]
input_std = [0.26862954, 0.26130258, 0.27577711]

transform=torchvision.transforms.Compose([
    torchvision.transforms.Resize(256, torchvision.transforms.InterpolationMode.BICUBIC),
    torchvision.transforms.CenterCrop(224),
    torchvision.transforms.ToTensor(),
    torchvision.transforms.Normalize(input_mean, input_std),
])
HMDB-51のゼロショット評価
ライブラリをロードします。
from decord import VideoReader, cpu, gpu
import numpy as np
from PIL import Image
from tqdm import tqdm
Text4Visのコードを見たところ、HMDB51のプロンプトは「a video of a person {}」のみでした。Textの特徴量を作ります
## text features
texts = [f'a video of a person {x}.' for x in test_files.keys()]

clip_model.eval()
model_full.eval()

texts = clip.tokenize(texts).cuda()
with torch.no_grad():
    text_features = clip_model.encode_text(texts)
    text_features /= text_features.norm(dim=-1, keepdim=True)
    print(text_features.shape) # (51, 512)
ゼロショットのTop1精度を評価します。Decordの使い方は別記事で解説する予定。
## Image features + similarity
is_correct_all = []

for class_idx, (class_name, video_list) in tqdm(enumerate(test_files.items())):
    is_correct_class = []

    for test_video_path in video_list:
        vr = VideoReader(f"hmdb51/{test_video_path}", ctx=cpu(0))
        slice_indices = np.linspace(0, len(vr), 9).astype(np.int32)[:-1] #17

        with torch.no_grad():
            image_input = torch.stack([
                transform(Image.fromarray(vr[s].asnumpy())) for s in slice_indices
            ], dim=0).half().cuda() # # [slice, n_dim]
            image_features = model_full.encode_image(image_input) # [1, n_dim]
            image_features /= image_features.norm(dim=-1, keepdim=True)

            similarity = (100.0 * image_features @ text_features.T).mean(dim=0) # [n_classes]
            if similarity.argmax().cpu().numpy() == class_idx:
                is_correct_class.append(1)
            else:
                is_correct_class.append(0)

    is_correct_all.append(is_correct_class)
精度を評価したところ、48.17%でした。
all_accuracy = np.array(sum(is_correct_all, [])).mean()
print(all_accuracy)
# 0.48169934640522877
試しに参照フレーム数を16フレームにしてみたのですが(動画の前後で8フレームずつとって、類似度の平均でアンサンブル)、精度は48.58%あまり変化はありませんでした。
Text4Vis + ViT-L-14
もう少しモデルを重たくしてみます。Text4VisにはViT-L-14用のモデルが公開されているので試してみます。あまりに重たいのでGoogle Drive経由の受け渡しになりので適当にマウントしてコピーください。
clip_model, clip_state_dict = clip.load(
    "ViT-L/14",
    device='cuda', jit=False,
    internal_modeling=False,
    T=8,
    dropout=0.0,
    emb_dropout=0.0,
    pretrain=True,
    joint_st=False) # Must set jit=False for training  ViT-B/32
video_head = video_header(
    "Transf",
    clip_state_dict)

model_full = VideoCLIP(clip_model, video_head, 8)
checkpoint = torch.load("k400-vitl-14-f8.pt", map_location='cuda')
print('load model: epoch {}'.format(checkpoint['epoch']))

model_full.load_state_dict(update_dict(checkpoint['model_state_dict']))
model_full = model_full.cuda()
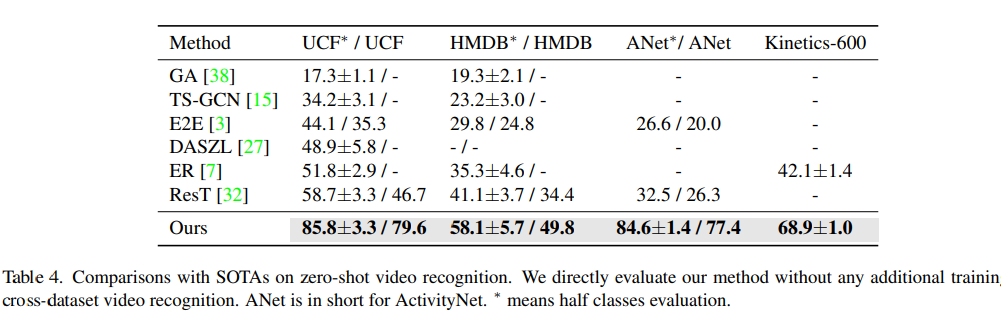
同様に評価したところ、精度は52.59%となりました。
torch.Size([51, 768])
51it [15:13, 17.92s/it]0.5259259259259259
論文によると、58.1±5.7なのでほぼ想定通りという感じでしょうか。(Half class evaludationというのがチート臭しますね)
CLIPのみとくらべて何が変わったか?
ここでの疑問は、「Text4Visは、CLIPだけと比べてどの程度精度が上がったのか」という点です。例えばCLIPでフレーム単位の演算をして、平均をとるなりのアンサンブルをすれば同じことはできるはずです。このケースを調べてみます。
OpenAIのCLIP
https://github.com/openai/CLIP
Text4VisのCLIPとOpenAIのCLIPを区別するために、一旦カレントディレクトリを分けます。
%cd ..
OpenAIのCLIPをインストールします。
!pip install git+https://github.com/openai/CLIP.git
OpenAI CLIPでViT-L-14で推論してみます。フレーム間は類似度の平均を取ります。
import clip

clip_model, clip_preprocess = clip.load(
    'ViT-L/14', device="cuda")

## text features
texts = [f'a video of a person {x}.' for x in test_files.keys()]

texts = clip.tokenize(texts).cuda()
with torch.no_grad():
    text_features = clip_model.encode_text(texts)
    text_features /= text_features.norm(dim=-1, keepdim=True)
    print(text_features.shape)

## Image features + similarity
is_correct_all = []

for class_idx, (class_name, video_list) in tqdm(enumerate(test_files.items())):
    is_correct_class = []

    for test_video_path in video_list:
        vr = VideoReader(f"Text4Vis/hmdb51/{test_video_path}", ctx=cpu(0))
        slice_indices = np.linspace(0, len(vr), 9).astype(np.int32)[:-1] #17

        with torch.no_grad():
            image_input = torch.stack([
                clip_preprocess(Image.fromarray(vr[s].asnumpy())) for s in slice_indices
            ], dim=0).cuda() # # [slice, n_dim]
            image_features = clip_model.encode_image(image_input) # [8, n_dim]
            image_features /= image_features.norm(dim=-1, keepdim=True)

            similarity = (100.0 * image_features @ text_features.T).mean(dim=0) # [n_classes]
            if similarity.argmax().cpu().numpy() == class_idx:
                is_correct_class.append(1)
            else:
                is_correct_class.append(0)

    is_correct_all.append(is_correct_class)

all_accuracy = np.array(sum(is_correct_all, [])).mean()
print(all_accuracy)
# 0.5501089324618736
結果は55.01%となりました。あれ、Text4Visより上がってる?
OpenAI CLIPのViT-B-32でも評価してみたところ、44.27%(0.44270152505446625)でした。Text4VisのViT-B-32が48.17%だったので、ViT-B-32まで落とせば若干Text4Visに優位はあるようです。
OpenCLIP
https://github.com/mlfoundations/open_clip
MLFoundationsから提供されているOpenCLIPでも評価してみましょう。OpenAIのCLIPは訓練データセットが明瞭ではないのに対し、OpenCLIPはLAION Datasetというオープンデータセットを使っているため、訓練データが明確です。
OpenCLIPをインストールします。
!pip install open_clip_torch
OpenCLIPのViT-L-14でも評価します。
import torch
from PIL import Image
import open_clip

clip_model, _, clip_preprocess = open_clip.create_model_and_transforms('ViT-L-14', pretrained='laion2b_s32b_b82k', device="cuda")
tokenizer = open_clip.get_tokenizer('ViT-L-14')
## text features
texts = [f'a video of a person {x}.' for x in test_files.keys()]

texts = tokenizer(texts).cuda()
with torch.no_grad():
    text_features = clip_model.encode_text(texts)
    text_features /= text_features.norm(dim=-1, keepdim=True)
    print(text_features.shape)

## Image features + similarity
is_correct_all = []

for class_idx, (class_name, video_list) in tqdm(enumerate(test_files.items())):
    is_correct_class = []

    for test_video_path in video_list:
        vr = VideoReader(f"hmdb51/{test_video_path}", ctx=cpu(0))
        slice_indices = np.linspace(0, len(vr), 9).astype(np.int32)[:-1] #17

        with torch.no_grad():
            image_input = torch.stack([
                clip_preprocess(Image.fromarray(vr[s].asnumpy())) for s in slice_indices
            ], dim=0).cuda() # # [slice, n_dim]
            image_features = clip_model.encode_image(image_input) # [8, n_dim]
            image_features /= image_features.norm(dim=-1, keepdim=True)

            similarity = (100.0 * image_features @ text_features.T).mean(dim=0) # [n_classes]
            if similarity.argmax().cpu().numpy() == class_idx:
                is_correct_class.append(1)
            else:
                is_correct_class.append(0)

    is_correct_all.append(is_correct_class)

all_accuracy = np.array(sum(is_correct_all, [])).mean()
print(all_accuracy)
# 0.48518518518518516
こちらは48.52%でした。やはりOpenAI CLIPの謎訓練データが効いて精度が上がっているようです。
OepnCLIPでもViT-B-32まで落とすとどうでしょうか?
clip_model, _, clip_preprocess = open_clip.create_model_and_transforms(
    'ViT-B-32', pretrained='laion2b_s34b_b79k', device="cuda", precision="fp16")
tokenizer = open_clip.get_tokenizer('ViT-B-32')
以下省略。PrecisionをFP16にしていますが、ほとんど精度が下がらなかったためそうしています。推論高速化のためにはいいでしょうね。
このケースでは、精度は41.31%(0.4130718954248366)となりました。やはりOpenAIのCLIPのほうが若干精度が出るようです。
結果まとめ
HMDB51でのゼロショット評価は以下の通りでした。
| ViT-B-32 | ViT-L-14 | |
|---|---|---|
| Text4Vis | 48.17% | 52.59% |
| CLIP (OpenAI) | 44.27% | 55.01% |
| CLIP (OpenCLIP) | 41.31% | 48.52% |
Text4VisよりOpenAIのCLIPが精度を出したのは謎ですが、HMDB51自体がそこまで精度の出るデータセットではないので、他のデータセットで評価したら変わるかもしれないです。
あと今回はやらなかったのですが、Text4Visでは動画をクロップしてTTAする的なことをしたので、これをやるといくぶんか精度が上がるものと思われます。興味あったら論文のソースコードを見てください。
またText4Visは、Few-shotでの学習も想定しているので、そちらでも活用できます。
Shikoan's ML Blogの中の人が運営しているサークル「じゅ~しぃ~すくりぷと」の本のご案内
技術書コーナー
北海道の駅巡りコーナー